
The whole subject of colour temperature (or white balance) sounds scary. But really, it’s not a big deal.
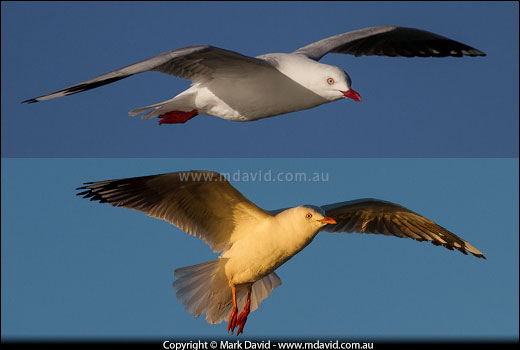
Same kind of bird (Silver Gull), but different types of light resulted in different colour temperatures.
When you walk from natural light outside to artificial light indoors, your eyes quickly adjust to the slight differences in the colour of the light. So for example, we don’t even notice the fact that an old-fashioned incandescent bulb is making everything look yellow.
Modern digital cameras do the same thing: they adjust themselves to suit the colour of the ambient light. But sometimes they need some help.
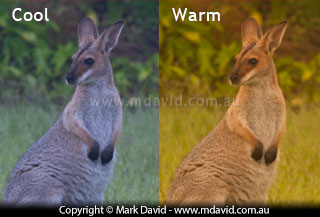
Too cool or too warm — the colour temperature makes a world of difference.
What is colour temperature?
I’m no physicist so I won’t pretend to give the world’s most accurate definition. But for the purposes of surviving this you can think of colour temperature as a way of describing the colour of the ambient light. Your camera has to know that as a sort of ‘starting point’ in getting all the other colours looking right.
The time when you really notice colour temperature is when your camera gets it wrong, because things that should be white can appear blue or yellow. That’s why photographers sometimes call it ‘white balance’.
Warm or cool
As you’d expect from something called colour temperature, it’s described in terms such as ‘cool’ and ‘warm’. If the colour temperature in your photo was too cool everything would look too blue. And if it was too warm then everything would look orange/yellow.
Automatic or manual
Some photographers like to take control of their colour temperature settings before they take their photos. In other words, they choose to set the values manually instead of trusting the camera. Most of the time I’m not much of a fan of that method because it’s just one more thing to do. Also because the colour temperature is likely to change a little bit while you’re out (critters running from direct light into shadows for example) then chances are I’ll be making tiny adjustments to the colour temperature anyway, when I open the files in my RAW editor. I talk more about that in a moment.
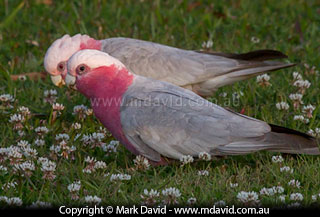
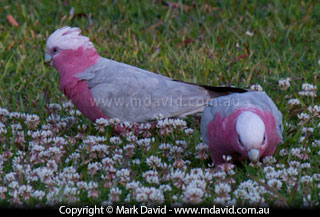
You can see by the bluish tinge in the second photo that the colour temperature changed the moment these Galahs stepped into the shadows.
Here’s what I do
I leave my camera at its default settings for colour temperature. Which means it sets it automatically.
And I have my camera set to work in RAW mode so I can make the small fixes later.
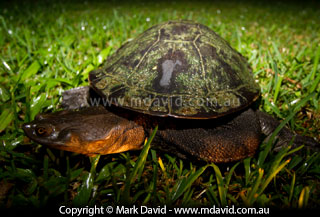
Combining two different light sources can play havoc with white balance. In this photo I was using a torch light to focus and a flash to take the shot. Except the torch light had a warmer colour temperature than the flash. That resulted in the lower part of the image (the bit where the torch was aimed) being stained orange.
Post-processing
After I’ve taken my photos I load them into my RAW editor. The RAW editor is the software I use to view and process my RAW files.
If the light was good and I had done everything right, I won’t need my RAW editor to do anything other than export my shots as JPGs or TIFs or whatever. But if I do need to make some changes the very first thing I check is the colour temperature.
You’ll know if the colour temperature is wrong because everything will either look too yellow or too blue. Pay attention to things like skin tones, plumage and foliage. Green grass should look green, not some sort of icy bluish colour or bilious yellow-olive colour.
How do you fix it?
Easy. Your RAW editor will most likely have some kind of colour temperature (white balance) slider. In the screen grabs below I show how that slider looks in Adobe Lightroom — it’s the one called ‘Temp’ — but other software packages work pretty much the same way. You drag the slider towards the warm (yellow) end or towards the cool (blue) end until things look right. A word of warning though: if your auto white balance feature of your camera was operating then you probably won’t need to make much of an adjustment at all. So go easy with that thing.
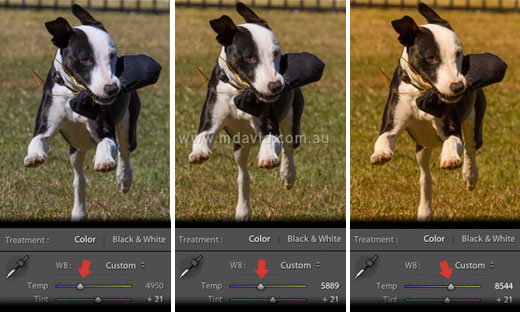
LEFT: This dog was photographed in the middle of the day. That resulted in the shot looking a bit desaturated and blue. CENTRE: Dragging the ‘Temp’ slider (indicated by the arrow) to the right put some much needed warmth into the tonal values. RIGHT: However if you drag that slider too far you’ll end up with something looking too yellow and artificial.
Some people argue that you’re not a real photographer unless you take manual control over your camera’s colour temperature settings all the time. I don’t agree with them. My definition of a real photographer is someone who takes wonderful photos, and that definition doesn’t include whether they do or don’t fiddle with dials and menus on their camera.
In the end, you’ll find your own preference for how you like to take photos. But the nice thing is, you no longer have to worry about colour temperature.


