
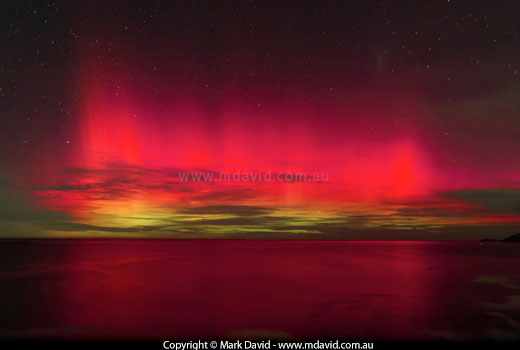
Photographing an aurora is like other types of night-time sky photography. You want a tripod and long exposures and a good “dark” sky. That means a sky that’s not filled with artificial lighting or a bright moon. Point a wide-angle lens where the aurora should be, set its aperture to its biggest (that means its smallest f-number), crank up the ISO as high as you feel your camera can comfortably go, and then try some long exposures, like for example 20 seconds. And see how it turns out. A few experiments will determine the ideal exposure time.
If you live in a place where auroras are uncommon like I do, then it will help to have an app, or a website, to tell you when aurora activity is likely to peak. You might want your app to show something called a KP-Index. A high KP-Index (5 and above) indicates a good chance of photographing an aurora. You also need to check for cloud cover because you could get a fantastic aurora but never see it because it’s behind the clouds. In the Southern Hemisphere that means a clear, mostly or fully cloudless sky to your south. In the Northern Hemisphere you want clear skies to your north. A full moon could possibly provide too much light pollution for a good aurora shot, so you want what astronomers call a “dark sky”.
So your app is screaming at you that an aurora is going to be partying. To get your clearest aurora shots you want a spot where the sky looking towards the aurora is not over any city lights.
Seriously, modern mobile phone cameras are now so good, many of them can take long exposures in the dark. So you can just aim your mobile phone camera where you think the aurora should be and take your chances. You might be pleasantly surprised.
Aurora photography is night time photography so that just screams long exposures. And long exposures mean your camera has to be held very, very still. So I’m talking tripod.
I use a cable release to activate the shutter button so I won’t jiggle the camera while using it. I press the cable release button and count the seconds in my head before releasing the button. But if you don’t have a cable release you also have the option of doing a delayed exposure — the option to set a short timer before taking the shot — and setting the exposure time in your camera.
An aurora is a big thing taking up a reasonably wide-angle section of the sky. So you’ll need a wide-angle lens to take it in. Use the widest wide angle lens in your camera bag. Or, if you don’t have interchangeable lenses, then just zoom out as far your zoom can go. That means make everything in the viewfinder look distant.
It’s night time so you want your aperture opened up as much as it can go, to let in as much light as it can. That means choose the smallest f-number your lens can manage.
There’s not going to be much light, so you want a high ISO to force your camera to amplify whatever light signal its sensor can record, but not so high that you create a snowstorm of pixel noise. The camera I use is comfortable at ISO 3200 and if I go higher than that, image quality declines. So I choose ISO 3200. You’ll probably know from experience how high your camera’s ISO can realistically go.
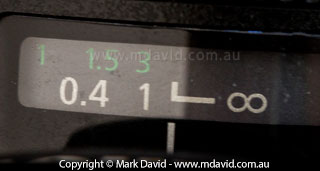
The focus indicator tells me this lens is focused to infinity.
Thankfully, on my lens there’s a sneaky little thing on it that shows me when I’ve focused to infinity, which I’m showing here. Check to see if your lens has one of those, because it sure makes things easier.
In daylight that’s easy. But in the night it can be tricky. Your camera’s autofocus for example is unlikely to work in the dark. But as far as the camera is concerned, the aurora is pretty much infinity metres away, so set your focus to infinity. Some lenses mark where the infinity focus setting is. If you have that option then this is a good time to use it. If you don’t have that option then try focusing your lens before night time while there’s still light. Focus on the most distant thing you can see. And then leave it set at that focus.
If the moon is out then you can try focusing on the moon. The moon is much further away than the aurora but it’s good enough because your camera still sees that distance as infinity.
A good landscape image will usually have foreground elements (pebbles, rocks, plants, rock pools etc), mid-ground elements (trees, rocks and hills) and background elements (the horizon and the aurora). Try to think more creatively than I did in my sample aurora image above. You’re not just capturing an aurora. You ideally want to capture a beautiful image. If you’re using a wide angle lens then that lens will bring with it a lot of depth of field, which is just what you want for this kind of image.
Your camera is on the tripod. It’s pitch dark, and standing in a remote place in the dark is making you question some life choices. But your camera is turned on and aimed and focused into the distance (pointing south in the southern hemisphere). It’s time to take a test shot
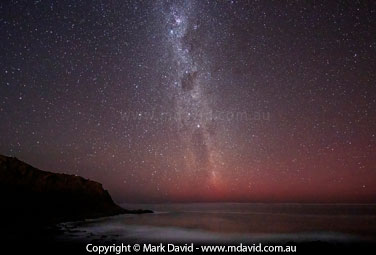
This photo captured part of the Milky Way behind the aurora.
Bulb mode is one of the modes available to most modern cameras, as an alternative to shutter speed priority mode, aperture priority mode or manual mode. It can be accessed either with the mode dial, or via one of the menu settings. It’s the mode I use but if your camera can be set to take long exposures, like for example 20 seconds, then you have the option of using Shutter Speed (Time Value) Priority mode.
Bulb mode is one that keeps your shutter open for as long as you hold the shutter button down. This is what I use and it’s why I need a cable release. Because if I jiggle the cable release button the jiggles don’t make it all the way down the cable to the camera and so the camera stays perfectly still. Which means the stars come out as dots instead of little squiggles. But an alternative to bulb mode is to use the delayed exposure option (allowing the camera to stop jiggling in the delay before the camera fires) and to have set your shutter times in the camera, providing your camera will allow you to set such long times as 15 seconds, 20 seconds or more.
Take a test shot. You might want to try, say, a 20 second exposure. And then using the preview option on the back of your camera, see how that turned out. If everything is too bright, go for a shorter exposure time / shutter speed to darken things up a bit. Like 15 seconds or even shorter. If it’s too dark, go for a longer one. Like for example 25 seconds. After a few experiments you’ll figure out how long your shutter times need to be.
After you’ve taken some test shots, they might also indicate that your camera is not correctly pointing towards the best part of the aurora. If that’s something you need to fix then now’s your time to do it.
When you see your aurora photo on a computer screen it’s going to show stars. If you’re shooting wide-angle at 20 seconds then it will probably be okay but a 60 second exposure is probably going to turn those little star dots into little lines of star trails. Because those little dots of light are moving in sky. Fast enough to be noticeable in a one-minute exposure. That’s why I try to avoid going longer than about 25 seconds. If you are getting nice colours but think you need to go even longer than 25 seconds, then think about lightening up your image in post-production on your computer instead of reaching for even longer exposure times.
If I see an aurora in Australia it looks to my eyes like a faint grey glow. That’s because of how our eyes work in faint light. But the long exposure in my camera picks up all the great colours that my eyes can’t see. On an exceptionally good Australian aurora night your naked eyes might also see faint colouration in sky. Not as dazzling as the photos you’ve seen, but a faint coloured “stain” on the night sky. On those nights your camera might pick up the yellowish-green visible near the horizon. The crimson colour is above the green and so Australians normally only photograph the crimson higher tips of the aurora that extend above the horizon. Green colouration in your photo indicates it’s a good night.
Auroras move and change shape and tend to flare up and fade and flare up again. Obviously you want to be around when the aurora is flared up at its brightest. So it can work to your advantage if you hang around and keep taking shots to see if things improve. I know some photographers who will stay all night, just for the chance to be there if and when the show reaches its peak.
When I’m working at night with my camera I prefer to use a red light torch. Red light is better than a regular torch because it lets you see what you're doing without messing up your night vision so much. So I can flick on my red light torch and adjust my camera and then go straight back to working in the dark. Just remember to turn the torch off before you take your shot, unless you want to paint red streaks and smears across your image.
When you get back home you might not need to do much processing of your shots to get some nice aurora images. If you experimented with a few test shots then your exposure settings should be close to being right. If you need to lighten the shot a little then your RAW program exposure setting will let you do exactly that. If you didn’t shoot RAW then you can also brighten your image a bit in Photoshop. This is similar to having taken a longer exposure so it’s not really cheating. Back in the days of film photography and darkrooms, photographers often made their images lighter or darker depending on how they processed them. So that kind of thing is not considered cheating.
Copyright © Mark David. All rights reserved


