
Single birds in flight are more tricky than a whole flock because you’ve got a more difficult job keeing a single bird in the frame while you’re focusing and panning and firing. And it’s even tougher with long lenses, due to the fact that the slightest movement or error in framing is magnified noticeably at the long focal lengths. First time I tried using a long lens with flying birds I was concentrating so hard on keeping the bird in the frame that I forgot about everything else and almost fell over. This is where it’s good to practise with common critters like pigeons. Or dogs.
Seriously, dogs running around in a park are fantastic photo subjects for practising the use of telephoto lenses on moving subjects. They’re big enough to focus on easily, run fast, and at off-the-leash parks they’re easy to find.
If I’m photographing dogs though, one thing I like to do is introduce myself to the owner before I take some shots. Just to make sure it’s fine with them, and to reassure the owner that I’m not taking photos for some negative reason like wanting to report them to the local council or to write a bad story in the newspaper about them.
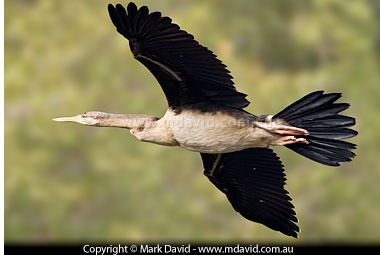
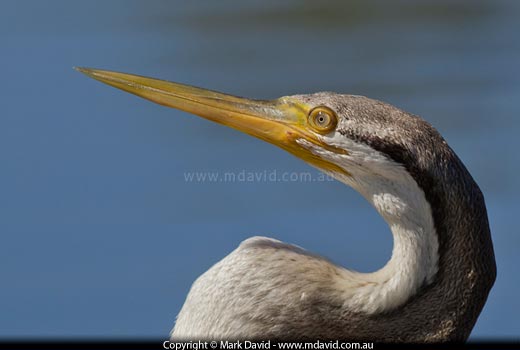
The large size of the Darter makes a photographer’s job a whole lot easier.
Now, the bigger the bird, the easier it is to get a nice flight shot of one. I’m talking birds the size of swans and pelicans. Because of their size you don’t need to be right next to them to get them to almost fill the frame. And your focusing system has a lot more bird to work with. Also, a large bird will appear to move more slowly through the frame than a small bird up close, making your job tracking it much easier.
You can use the same camera settings as given for flocks of birds on the previous page, which I reproduce here:
Start firing the moment you’ve locked focus and concentrate like crazy on tracking that bird!
Generally, the smaller the bird, the more difficult you will find it to get shots of them in flight. But of course there are some tricks you can use there too and I describe some of them in the sections below.
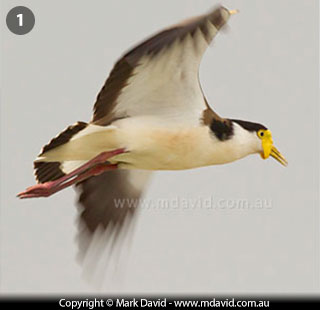
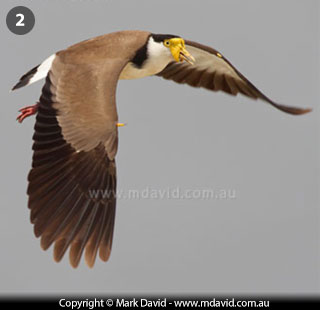
Photo 1 was taken with a shutter speed of 640th second. Photo 2 was taken at 1,000th second. You can see the differences in the amount of motion blur in the wings. I won’t tell you which speed to use because it’s up to you to decide which effect you like the most, but be aware that 1,000th second is much more forgiving in dealing with motion blur problems across the whole flying bird. Also, the smaller the bird, the faster the wing movement, and so the faster the shutter speed required to get the same effect. This critter, by the way, is a Masked Lapwing.
The cool thing about telephotos is that they bring the action up close. Well, we all know that. But the uncool thing about telephotos is that they can make it very hard to locate the bird in your viewfinder before it’s it too late to get your shot. That’s because telephoto lenses only show a very small patch of the sky, and a flying bird is likely to be especially difficult to find in it.
So here’s what I do.
Imagine you’re standing in a field wanting to take shots of flying birds. Now you and your camera don’t get much time to think when a bird flies past. Usually the whole thing is over in a few seconds. So it helps to be prepared.
You can start by having your lens zoomed out (minimum zoom) so you can see the maximum possible amount of sky through the viewfinder. Have your lens focused on something in the distance, similar to the distance you expect to first see your approaching birds. Your camera is set to servo focus, a nice fast shutter speed and fast-burst shooting. And you’re standing where I’ve drawn the cross in the diagram below.
And then …
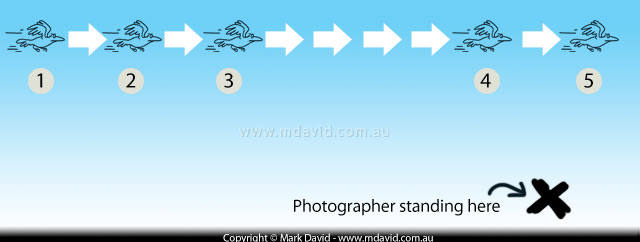
1 When you notice a bird heading your way (at point 1 on the diagram) you put the camera up to your eye and try to see it in the viewfinder. This is when you’ll be glad you’ve zoomed out because you’ll be able to find it more easily.
2 At point 2 on the diagram you should have the bird in the centre of the viewfinder and you should now be rapidly zooming in and focusing on the bird.
3 The bird’s now in sharp focus and you start firing a burst of shots.
4 This is the point where you will probably get your best shots. The bird’s about as close as it will get and it’s still coming slightly towards you (which means you can still see its face).
5 At this point I usually stop firing. The bird is flying away from you now and from this moment on the shots are likely to be less interesting, mainly because you won’t get a clear view of its face.
Because everything happens so quickly it will take a bit of practice to get a birds-in-flight technique working. Chances are that you will develop your own favourite way of working and I encourage you to do whatever works best for you. So as always, think of my suggestions as things from which you can get some ideas, but not any kind of strict rule on how you have to take your your photos.
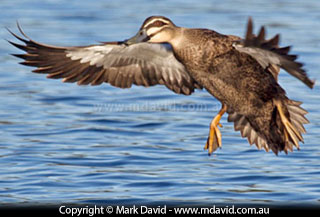
Birds normally fly with their legs tucked up beneath them. The moment you see the legs drop down, like with this Pacific Black Duck, you’ll know it’s about to land. That’s almost always a great time to start firing a fast burst of photos because you might get one of those dynamic kinds of shots with the bird’s wings outstretched as it touches down.
Birds will often crouch down before taking off. So if you have a bird in focus and it suddenly crouches down, immediately start firing in a fast burst. Chances are you might get a great shot of the bird with its wings outstretched and taking off. This can be be the best way to get flight shots of really small birds. Keep in mind though, that with the very small ones you still might not be quick enough.

By waiting for this Rainbow Lorikeet to crouch before take-off, I was able to get this shot of it in flight. This shot has been cropped a little bit to show off the bird better.
And another thing to remember with this trick is to make sure you have zoomed out a bit before the bird takes off. When the bird finally launches itself it is going to leave the scene fast, and if you’ve framed the shot tightly around the bird then all you’re likely to get is a shot of where the bird was.
Just like with take-offs, bird landings tend to be over before you realise it’s happening, yet landings can make for great action shots because the wings tend to be fully extended to slow themselves down and so the birds can look their absolute best. So how do know when to take your shot?
The answer comes from watching the feet! Just before landing the bird will swing its feet down and forward. I swear it’s true. And it works every time! Once you see that happening you can start firing shots in fast-burst mode and there’s an excellent chance that one of the resulting shots will catch the bird at that magic moment just as it is touching down.
When I describe this method of photographing landing birds I must admit I’m really only talking about medium-to-large birds. For small birds it all happens so crazy-fast that I consider myself lucky just to get any sharp shot of the bird in the air!
Some of the best bird photos I’ve seen have come from people who use hides. Hides can be temporary or permanent structures, or they can be nothing more than a camouflage blanket thrown over yourself while you lay on the ground being bitten by ants. One of the easiest (and portable) kinds of hides you can use is a car. Many birds which will take to the skies the moment you get within 50 metres on foot, will happily stay put if you approach in a car!
Of course, you have to make sure that you are observing all the usual safe procedures and rules for operating a car! Slamming your foot on the brakes and causing a rear-end collision because you noticed a duck sitting near the side of the road is not good practice for driving or photography.
Standing in the open is going to make you noticed just as much by birds as people. So I’ve found that leaning on a post or a tree can do wonders when dealing with easily spooked birds. It seems to minimise the number of shapes the bird sees, which makes it somehow less scary for them.
Another handy trick is to stop and stand very still the moment a bird notices you approaching. Only move in closer when the bird goes back to its normal behaviour (I’m hoping that ‘normal behaviour’ is not running away from you). This method of approach, pause, approach can be used on many different types of timid animals — not just birds. With practice you’ll start getting a good feel for how close different animals will let you get.
If you’re using this method of getting close to the bird, it’s good not to wait until you get right in close before you take your first shots. The bird might easily become spooked and take off suddenly and so you’ll be glad you got that earlier shot instead of missing out altogether.

These two Scaly-breasted Lorikeets suddenly started fighting, and so they temporarily forgot about their fear of me. Birds that are fighting each other can create dynamic and unusual images.
Birds which are fighting each other will often temporarily forget all about their fear of photographers and allow you to get quite close. If the light is good enough, set your camera to shutter speed priority with a speed of at least 1,000th second, and use servo focus. Then aim at the birds and take shots in fast-burst mode with your finger held down on the shutter button for as long as you think you are getting something. And hope for the best. Of course you’ll have to act quickly because these occasions tend to only last a very short time. The action will be so fast it will appear as nothing more than a blur to your eyes so you won’t know what kind of shots you’re going to get until it’s all over. The photo of the two Scaly-breasted Lorikeets at right is an example of two fighting birds. Yeah, people see that shot and think they’re doing some sort of friendly dance or something. But now you know.
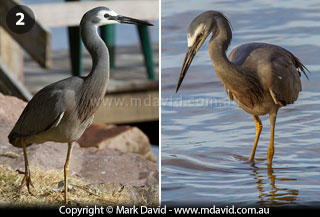
1: Birds in city parks are often used to being near people, and will therefore be more likely to let you get closer, but try to frame your shots or control your depth of field so you don’t see too much man-made clutter in the background. 2: Both photos are of the same White-faced Heron. One shot was ruined by a bunch of ugly artificial things in the background and the other one was saved by just waiting until the bird moved to a different spot.
It’s ironic that some of the best wildlife photos can be taken in the some of the least wild places. No, I’m not talking about zoos (which of course make wildlife photography easier). I’m talking about parks. If you have a park nearby then you’ll often get some great photos of birds, especially if there are large ponds. Ponds are bird magnets. If a bird flies into a park then chances are it’s one that is less easily spooked by people. In some parks you can get right up close to birds. Parks are also a great place to practice your bird photography so you can get your technique polished up before you head off to some wild places.
If you do take photos of birds in parks, try not to get man-made things in the background because they are likely to detract from the shot. Unless of course the man-made stuff is part of the story you are conveying in the shot, for example, birds raiding garbage bins.
I doubt it! There are people out there taking some brilliant bird shots and most likely they work differently to me. The suggestions on these pages are just that: suggestions, which will hopefully give you some ideas or get you started.
Copyright © Mark David. All rights reserved


