
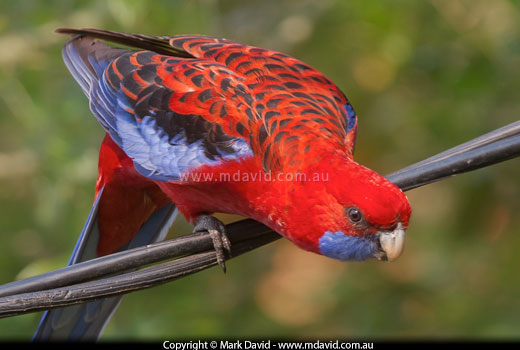
The smoke from a hazard-reduction fire burning a few kilometres away created a rich orange glow in the light hitting the plumage of this Crimson Rosella, simulating the kind of light you would normally get just before sunset.
Sometimes we forget the most obvious things, and so I’ll start with a real doozy. Photography is the capture of light. So the quality of the light is going to have a big effect on the quality of your photos.
And for most of the day, sunlight is yukky. No, really. It is. We underestimate how good our eyes are at compensating for harsh, desaturated light. I talk about this at length in my article about washed-out light, but the time of the day has a lot to do with how to get the rich, warm tones we’re used to seeing in postcards. It’s not that postcard photographers use different technology. They simply do most of their work at the right times of the day.
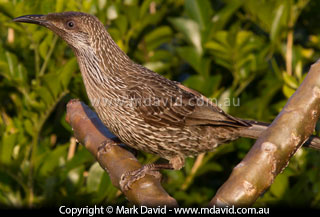
The warm colours in this image of a Little Wattlebird came from taking this photo half an hour before sunset.
Just after sunrise or just before sunset. At those times the sun hangs low over the horizon and its light reaches us after passing through much more hazy atmosphere than when it belts down at us from directly above. That restores the rich golden colours which midday light strips out, and the landscape will be saturated with beautiful colour. And your camera will eat it up, giving you the kind of vibrant images that middle-of-the-day photographers can only dream about.
So think about taking more photos in those special times of the day. It’s not by accident that professional photographers refer to them as ‘the golden hours’. I talk a whole lot more about this subject here.
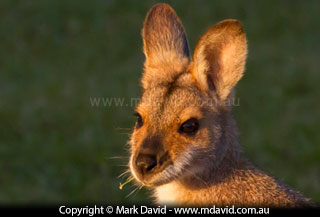
This Pretty-faced Wallaby joey was hidden all day and then came out into the open just as the light was at its best.
During those cooler hours, a lot of animals emerge from hiding. Chances are that creatures like wallabies would have slouched around somewhere in the shade during the stifling hot parts of the day. Then late in the afternoon (when it’s also much more comfortable for us photographers) they wander out into the beautiful light looking for food.
In wildlife photography, it helps to know your subjects. And one of the best things to know about them is where they eat and drink. For example, knowing which trees are full of nectar-rich flowers can often guarantee a nice shot of lorikeets.
Animals gorging themselves on their favourite food will often forget their normal skittishness and sit right in front of your lens. And because animals also need to drink, a creek or dam can often be a magnet for wildlife late in the day.
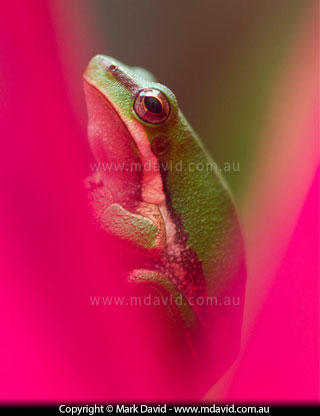
Wildlife can be hiding where you least expect it. This Eastern Dwarf Tree Frog was nestled into the fork of a Pink Cordyline.
Urban parks can be brilliant places for wildlife photography, especially if they have large, permanent ponds. Sydney’s Centennial Park is just one excellent example.
One of the big advantages of urban parks is that the wildlife will be used to being around people, which helps a lot when you want to get close to it with your camera. In those circumstances, pay extra attention to what gets into your backgrounds. You don’t want to have a stunning wildlife shot ruined by something like a garbage bin or street sign filling the background. With some creative framing of your shots, it’s not too difficult to make your city park photos look they were taken in the wilderness!
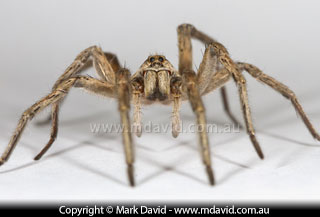
Getting the camera down low onto the floor at the spider’s eye level added some interest to this picture of a Wolf Spider.
Most of us are familiar with birds like pigeons walking around near our feet. This makes us all too used to the sight of the tops of birds’ heads. Yet when most people take a picture of a bird on the ground, they stand near the bird and point their camera down at it. The result is almost guaranteed to be boring!
In my opinion, one of the best angles to photograph any critter is from their own eye level. That often means getting yourself right down onto the ground. To see the difference, you can practice with a pet cat or dog. Take a shot looking down at it from your height, and then get down onto the floor and take another shot with the camera held at their eye level. Now see which picture you prefer!
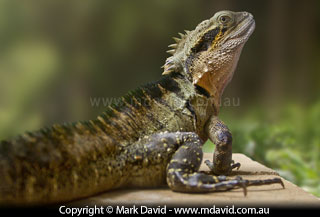
If you can’t get the whole animal sharp, then try to lock focus on the eye, as I did when photographing this water dragon.
When you’re taking a photo of an animal I strongly suggest you focus on the eyes. Having the eyes in sharp focus will help you ‘connect’ with the subject so much better in the resulting photo. If you can’t get both eyes sharp, focus on whichever one is closest.
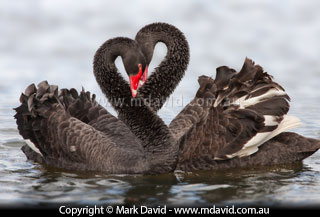
When one animal encounters another, the body language can make for some intriguing shots. In this case, a pair of Black Swans were posturing in a show of strength, which resulted in them forming a heart shape with their necks.
An animal on its own can make for a great shot. Watch for anything out of the ordinary. For example, big yawns revealing lots of teeth, or lazy stretches, and especially those times when the creature looks your way.
And when your subject meets another animal then things can get so much more interesting. Animals do most of their communication using body language, and that’s the kind of stuff that makes for more intriguing shots. Watch for those ‘animal encounter’ moments. At times like these you might have to work quickly to capture the action, especially if there’s a lot of posturing or competition going on. If some sort of conflict flares up then chances are it will all be over in seconds, so a fast burst of shots, if your camera allows for that function, can be better than trying to time the perfect single shot.
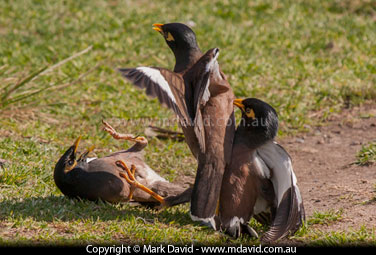
Indian Mynas scrapping in a Sydney park. The shutter speed I used was 1,000th second.
I once saw some Indian Mynas scrapping in a park and so I just pointed the camera at them and started a fast burst of exposures. Everything was happening so quickly I had no idea what I was getting. At times like this, only a very short shutter speed, like 1,000th second, will be sufficient to freeze the action. Chances are, you might get one or two keepers, but sometimes you get lucky with a whole sequence of interesting shots. Pictures taken this way can sometimes be the most dynamic and unusual images because they reveal poses that happen too quickly for the eye to see.
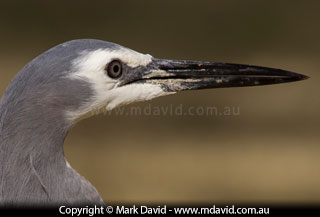
This White-faced Heron came so close I was unable to get the whole bird into the frame, and stepping back would have frightened it. So instead, I used the opportunity to get some nice portraits.
Sometimes your subject will move in so close you won’t be able to get it all into the frame. At times like that, think about taking a portrait shot of its face. Focus on the eyes (or the closest eye if you can’t get both in focus) and if the animal looks you way then that’s even better. Don’t use too big an aperture or else parts of the face might end up too much out of focus. For this kind of portrait shot I’d suggest something like about f/8.
When you take a photo, the box-shaped border of the image plays an important part in its composition. How you position that box around your subject can have a big effect on your photos.

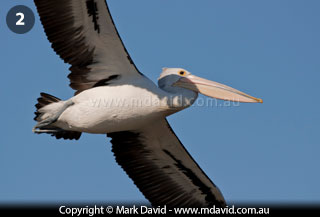
Try to frame (or crop) your photos so that the animal appears to have some space in front of it. In picture 1, the pelican looks like it was hemmed in by the edge of the frame but in picture 2, that is no longer an issue purely because the photo has been cropped differently.
For example, if you take a shot of a moving animal, try to frame your shot so that there is some empty room in the frame in front of the creature. Otherwise your picture will give the impression that the animal is cramped into too small a space. Even if the animal isn’t moving, it can help to get some empty air in the frame in front of where your subject is looking. It can make an animal look so much more like it’s ‘in the wild’ if you do that.
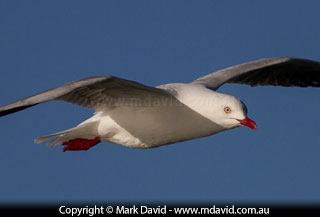
This Silver Gull was photographed in Shutter Speed priority mode set at 1,250th second.
Animals might be tricky to photograph when they’re still, but that’s nothing compared with when they’re running. Here’s how I photograph fast-moving animals.
First step is to switch the camera to Shutter Speed Priority mode. That means the camera gives priority to whichever shutter speed you select while it figures out what aperture it’s going to use.
Then select a nice, fast shutter speed. For medium-sized flying birds, 1,000th of a second will freeze the action nicely, assuming that the light is bright enough, while 500th second will allow for some motion blur in the wings. For smaller birds, even 1,000th second will result in motion blur in the wings.
Here’s a catch though: in the beautiful rich-light moments after sunrise or just before sunset, the light just might not be strong enough for such a fast exposure, in which case you’ll need to pick the slower option.
Aim and focus on the creature while it approaches and take your shots in a fast burst until it starts to go past you. After that you can probably stop shooting because you won’t be able to see the animal’s face any more.
Because the creature is changing its distance from you the whole time, you’ll need to use an autofocus mode that keep adjusting while the shutter button is held down.
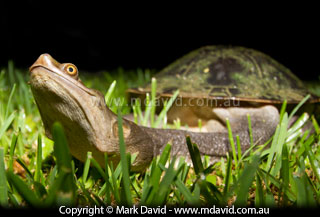
Wide-angle lenses can make your images look more dynamic, but you need to take your lens as close as possible to your subject. In this case it was a freshwater turtle.
I love wide-angle lenses. Wide-angle lenses are the ones with the shortest focal lengths.
Most people think wide-angle lenses are for standing back and getting everything into your shot. In my opinion, that’s the most boring way to go wide.
You’ll need an especially cooperative critter to succeed here, but if you have a wide-angle lens, try getting in as close as possible to your subject. I’m talking about maybe less than 20cm away from a small animal or only about a metre away from a big one like a horse. The animal will dominate the frame at that close distance, but the camera will look out and take in much of the surrounding environment at the same time. The creature will look more engaging, and it will be embedded into its surroundings in a way no other kind of shot can match.
Here’s a trick that can come in handy if you keep getting blown-out highlights. By ‘blown-out’ I mean a part of your photo, perhaps a patch of white feathers or some other light-coloured thing in direct sunlight, which ends up being so badly overexposed that it goes pure white, with no detail captured at all.
The reason this can happen is because even today’s clever cameras have their limits. On a bright day the difference between the lightest and the darkest parts of a scene can be too much for the camera to get it all.
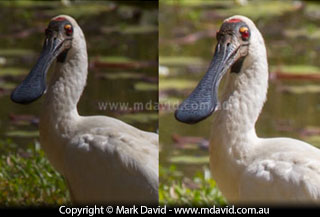
I deliberately underexposed this photo of a Royal Spoonbill (left) to avoid blown-out highlights in its white plumage. Then I lightened up the shadows in Lightroom (although other types of RAW image processing software can do the same thing).
You’ll need some software on your computer here, but what I do is to deliberately underexpose my shots a little bit so that I no longer get any blown-out bits. To force my camera to underexpose, I use a feature called ‘exposure compensation’. If your camera has that feature then it’s worth getting to know it.
And then on my computer, I lighten the shadows a little to bring back some details. The result is a photo with both highlights and shadows correctly exposed. But go easy with this one. Overdo it, and you’ll end up with images looking fake and flat and grey.
If you want to know more about this method, then you can read all about it in my article about photography in harsh light.

The background in this photo of an Eastern Dwarf Tree Frog was blurred by the use of a big aperture. I still made sure that the eyes were in focus though!
Sometimes a critter looks just so good you don’t want anything else in the photo to distract from it. A great trick for this occasion is the use of a nice big aperture to soften the background.
A big aperture (that means a small f-number) will reduce your depth of field. Huh? Okay, I’ll say that again in English, it means that choosing a small f-number in your aperture setting will result in your animal subject being sharp while everything else in front and behind is blurred away.
To create a big aperture you put your camera into Aperture Priority mode and choose a small f-number.
If all that stuff about aperture and depth didn’t make sense to you, then I suggest you read my introduction to digital SLR photography here.
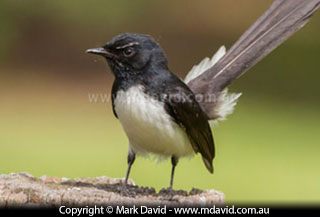
A telephoto lens helped this Willie Wagtail stand out from what would have otherwise been an ugly, distracting background (an old shipping container).
There’s another way of getting that effect too, and if you combine it with the big aperture then you can get silky-smooth soft backgrounds behind your critters.
That method is to use the longest focal length lens you’ve got.
Stand at distance using your longest focal length. Then kneel down so your camera is at the eye-level of your subject. That means the background behind your critter will no longer be the grass beneath it. Instead it will be something on the horizon, which will be so far away that it’s seriously out of focus. And because the long lens only captures a tiny bit of that out-of-focus horizon (it’s like looking down through a tube) then that little patch of background will be stretched all the way across the frame behind the subject.
The result is a super-smooth blurry background that makes your subject really pop out.
And if you want to understand better why a telephoto lens does this, then have a look at this page.

This photo of a one-day-old Masked Lapwing chick was taken with a hide.
Some animals, like many species of birds for example, get badly stressed at breeding time and if you frighten them too much they might even abandon their babies. For that reason, I encourage you to be especially careful around nesting birds. Use your longest telephoto lens and even then, only proceed if your actions don’t appear to cause any difference in the behaviour of the parents. In fact, in some parts of the world it’s illegal to photograph nesting birds.
The truth is, the shot’s not worth it if the subject has to suffer for it.
A famous photo editor once said, “If you want to be a better photographer, stand in front of more interesting stuff.” It’s hard to improve on wisdom like that. Wildlife photography is not only rewarding in itself, but it also gets you out in front of lots of interesting stuff. So have fun, and good luck!
Copyright © Mark David. All rights reserved | Mark David on Google+


