
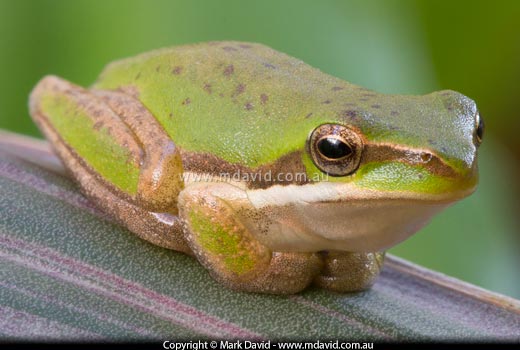
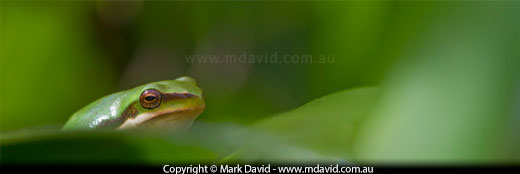
This tree frog was in very weak light. A tripod let me keep the camera still during the long exposure I wanted.
I remember being amazed at how cheap and light my first tripod was. I remember then being amazed at how bad it was. Even a mild breeze would cause the camera to wobble. But I still have that tripod and it actually gets a fair bit of use. I just don’t let it near a camera. Instead, I use it to hold other stuff, like props or a flash. Eventually I bought a proper tripod and that’s the one I always use now.
So if you plan on getting a tripod then plan on it being a good one. It needs to be sturdy enough to easily hold your camera steady when it’s loaded up with your heaviest lens, and that includes planning ahead for any future heavier lens you might have in mind. When you realise that we tend to keep our tripods for a lot longer than our cameras then you can think of it as a long-term investment.
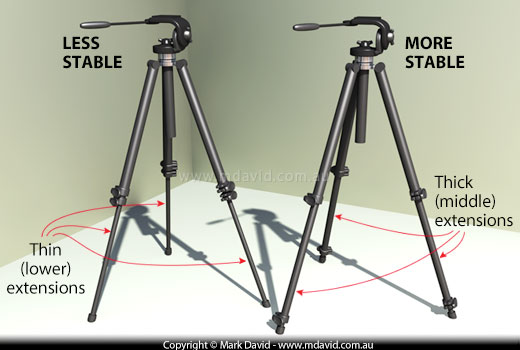
If you don’t need to extend your tripod’s legs all the way, then using the thicker extensions will make the whole thing a little bit more stable.
The way you extend the legs on your tripod affects how stable it is. If you only need to use one set of extensions then use the thicker ones (the middle sections). Because of their extra thickness it makes the whole structure just that little bit more stable.
The thing about tripods is that they’ll always have all three feet on the ground. That is, until they topple over. So keep in mind the inherent strengths and weaknesses of a triangle.
Tripods are at their most stable when they’re leaning against one of the legs (a corner of the triangle), and at their least stable when they’re leaning against one of the triangle’s sides. So when I have to perch my tripod on a hill, I like to have one of the legs pointing down the hill. That way it has its greatest level of protection against rolling down the hill with me chasing after it. You’ll need to look at your particular circumstances and figure out for yourself what’s going to be most stable of course, but that’s what I usually do. And if you need to extend the centre post of the tripod upwards, try to ensure that it goes up rather than at an angle, so that the weight of the camera is always over the top of the centre of the triangle.
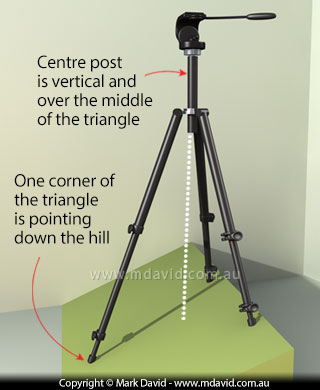
Here’s how I like to set up my tripod when I’m using it on the side of a hill.
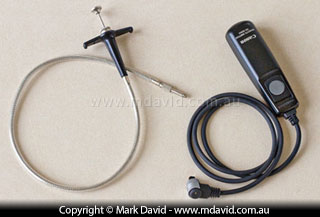
Mechanical (left) and electronic (right) cable release. It used to be that the mechanical ones worked on pretty much everything but now you have different makes and models of cameras requiring their own kinds of cable releases. Grrr… So if you’re going to get one of these things make sure it’s the right one for your camera.
If I’m going to all the hassle of using a tripod, then I’ll often use a cable release too. Especially if I’m doing macro photography. Cable releases are things that allow you to have the shutter button at the end of a cable with the other end of the cable plugged into the camera. When you press the button, the vibrations fail to travel all the way down the cable to the camera so it means your camera doesn’t jiggle. The combination of cable release and tripod is the reason my photos of tiny frogs come out tack-sharp. But don’t worry if you don’t have a cable release. A delayed exposure (where you press the button and the exposure happens 10 seconds later) will give your camera plenty of time to stop vibrating after you press that shutter button.
If your lens uses an image stabilisation system (or vibration reduction or whatever your lens manufacturer calls it) then check the manual to see if it has a setting for use on tripods. Because otherwise the image stabilisation system can become confused and cause weird things to happen.
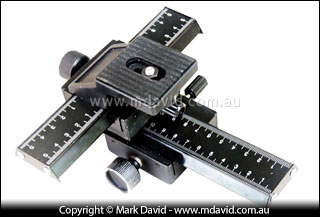
My trusty old macro focusing rail is mighty useful for precision macro work.
I swear by these things. But only for macro photography because with any other kind photography they are literally worse than useless. With a macro focusing rail you can set up your tripod in something close to the right place, and then fine-tune the camera’s position — horizontally and forwards/backwards — until you’ve framed your image exactly how you want it. So like the name suggests, they are brilliant for macro work, where a few millimetres of camera movement can drastically change a photo’s composition. You can even use your focusing rail to take a series of shots, one at a time, at different points along the horizontal rail. Stitch the shots together in your image editing software and you have an macro panorama. Or you can move the camera backwards/forwards in tiny increments to focus on different parts of the scene for image stacking. Either way, the focusing rail makes that kind of fiddly work heaps easier.
This macro panorama shot was created using the horizontal adjustments in a macro focusing rail.
But I’ll stress again that if you’re not doing macro work then don’t use a focusing rail. In regular photography that few millimetres of a camera movement won’t make any difference. Even worse, it’s an extra layer of clutter that could even be dangerous due to those focusing rails not being designed to handle the weight of telephoto lenses.
Yeah, I know tripods are boring and clunky and inconvenient. But most professional photographers have at least one decent tripod for the very simple reason that sometimes they are extremely useful.
Copyright © Mark David. All rights reserved | Mark David on Google+


