
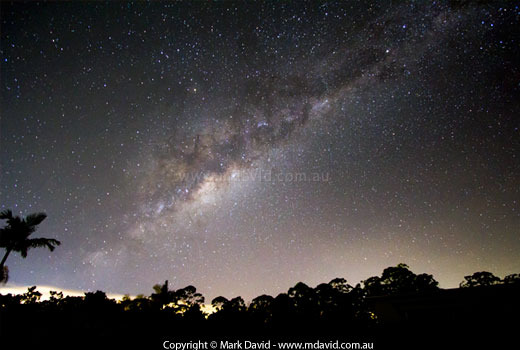
I know it seems obvious, but you want the sky to be really clear and really dark. By clear, I mean free of smog, haze, and of course clouds. And by dark I mean unaffected by town lights or the moon. The perfect sky is the one you get on a cloudless night in the country, before the moon comes up. But it can be anywhere that allows you to see the general shape of the Milky Way with the naked eye.
Working by torchlight is a bit tricky, so do as many of your camera settings as you can with the benefit of proper light inside. That includes fixing your camera onto your tripod. Even in good light it’s all too easy to muck up the way a camera is set onto a tripod.
Pick the widest wide-angle (the shortest focal length) you’ve got. On my APS-C camera I use my 10-22mm lens at 10mm and I still can’t get the whole Milky Way into the frame. However anything shorter than about 20mm should be fine on an APS-C camera, even if it’s an inexpensive kit lens. If you’ve got a full-frame camera then anything shorter than about 30mm should be fine.
You’re seriously going to need some way of keeping your camera still. And a cable release will ensure that your finger doesn’t wobble the camera through the shutter button.
Just like you have an aperture priority mode and a shutter speed priority mode, your camera should also have an option for bulb mode. In the pro and semi-pro cameras it will probably be an option selected as the ‘B’ on the mode dial, but otherwise it should be somewhere in your on-screen menus.
What bulb mode does is allow you to keep your shutter open for as long as you hold the shutter button (or in this case, the cable release button) down.
Open up your lens to the biggest aperture (smallest f-number) your lens can manage. Yep, I know that a small f-number will give you a small depth of field, but the way your camera sees it, all the stars are out at infinity anyway.
Autofocus needs light to work, so chances are you’re going to need some tricks to focus manually in the dark.
Unfortunately, with many lenses you can’t simply turn the focusing ring all the way round to one side, because that might overshoot the setting. Yeah, I know there’s no such thing as a distance more than infinity, but there is such a thing as turning a focusing ring more than where a lens is properly focusing to infinity.
So trick number 1 is to just focus your camera to infinity (focusing on the edge of the horizon or something like that) before it gets dark outside. In other words, to get outside and focus your camera on the horizon while it’s still daylight. Then switch it to manual focus and leave it there. But you still might accidentally move the focusing ring when you’re fumbling around in the dark, so here’s a couple more options.
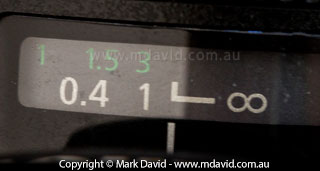
The focus indicator tells me this lens is focused to infinity.
Thankfully, on my lens there’s a sneaky little thing on it that shows me when I’ve focused to infinity, which I’m showing here. Check to see if your lens has one of those, because it sure makes things easier.
If it doesn’t, then you might get lucky manually focusing on something in the distance like a some lights on the horizon. There will often be something out there. Distant street lights, planes, UFOs etc should all do the job. And you’ll have some room for error because depth of field is really big on wide-angle lenses, even at big apertures. And depth of field gets even bigger with distant stuff.
Once you’ve found that magic infinity focus then leave your lens in manual focus mode and don’t touch it.
Star trails are the little curved trails left by the stars due to the earth rotating. Any exposure lasting more than about 30 seconds will give the beginning of star trails and with the longer focal length lenses you have an even shorter time before star trails appear. Now, maybe star trails are what you want. But since we’re going for a sharp picture of the Milky Way in this article then I’ll recommend keeping your exposure as short as you can. That means making your camera as sensitive to light as you can. So I like to use ISO 2,000 or even higher. Sure, that’s pretty high and it leads to some noise. But it will get you lots of stars too. If 2,000 is too high for your camera then you’ll just need to run a longer exposure to make up for it.
This is where a torch can come in handy. Shine your torch at the ground/trees/rocks while you look through the viewfinder framing your shot. Because otherwise your viewfinder will just look black and you won’t even be able to see where the ground is, making your framing/composition a hit and miss thing.
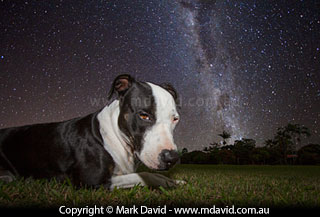
The dog was added later in Photoshop but the Milky Way background was photographed using the method described in this article.
Press the cable release button to start your exposure and keep the button held down. You might have a fancy cable release that locks the shutter open for a fixed time or you could have the low-tech version like mine where you need to hold the button down manually. Whatever type you have, try an exposure of 45 seconds and see what you get. You’ll probably need your torch to find your way around the camera to get to the buttons that show the picture on the screen. Also, zoom in the stars on your camera screen to confirm that they’re in focus.
If the whole sky turns out too bright in your test shot then keep your settings the same and try a shorter exposure. Perhaps 30-seconds, or even less. Or if it’s not bright enough then try a one-minute exposure, or longer. You just experiment with different exposure times until you get the shot you want. What the heck, try longer and shorter exposures anyway, just in case the results surprise you. But be aware that your Milky Way is going to start smearing out into star trails if you go much longer than a minute. So if you want to go brighter than what a minute gets you, try taking the ISO higher.
On a good clear night without too much city light pollution it should be possible to see the Milky Way with the naked eye. And your camera will be able to capture a heap more detail than what your eyes can see. That’s why so many Milky Way shots have a kind of arty science-fiction look about them. The longer the exposure, the more Milky Way detail you’ll get in your shot. In really long exposures, features on the land will also start to reveal themselves and the sky will lighten and become blue (or some other colour if it’s being stained by light pollution from artificial lights in the area).
It shouldn’t take many test shots before you figure out the ideal exposure time.
Here’s something for you folks working in icy cold conditions to keep in mind. Before you take your camera back into a nice warm house, seal it into a plastic bag and keep it in the bag while it warms up indoors. That’s so it won’t get affected by condensation. If you’re in a hurry to see your pictures on your computer, then take your flash card out and put it in your pocket while you’re still outdoors.
If you’re working in ideal conditions then you just might have everything you want straight out of the camera. But chances are that your photos will benefit from a bit of post-work on your computer.
Try increasing the contrast a little, and if you’re working in RAW mode, then try adjusting the colour temperature. Use your own judgment about what looks best to your eye.
And a little bit of luminance noise reduction will help the overall look of your shot too.
If you give this a go you might be surprised by the kinds of shots you get.
Copyright © Mark David. All rights reserved


