
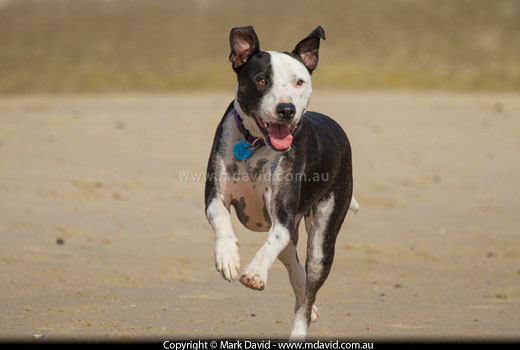
Focusing on a dog bounding towards you at more than 30kph would be almost impossible to do manually, so it’s mighty handy understanding how to make full use of your camera’s autofocus.
When you take a shot, it can be difficult getting everything in the scene — near as well as distant — in sharp focus. So you’re forced to choose which bits you want looking sharp.
When you focus your lens onto something, what you’re really doing is determining a distance to focus on.
To make sense of this stuff (and this is where lots of beginners get confused) you need to realise that the autofocusing is likely to involve two settings.
The first setting tells the camera which part of the scene to focus on.
And the second setting tells the camera if the subject is standing still or moving.
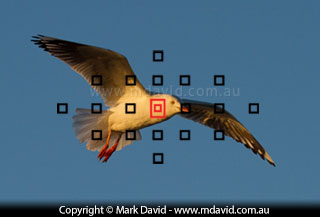
The little rectangles appearing in the viewfinder when you take a shot represent the focus points. In this example the centre focus point is flashing red to show that it’s working.
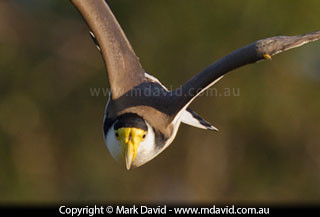
Look through the viewfinder and press the shutter button half way down (the shutter button is the one you press to take a photo) and you’ll probably see a pattern of rectangles over your scene, similar to what’s going on with the seagull shown here. Those rectangles represents what we call focus points.
Each of those focus points represents a tiny region within your scene where your camera is able to do its automatic focusing magic, and so the cluster of all of your focus points represents the full area of your scene where autofocusing is possible. In other words, if no part of your subject is behind any of those little rectangles then your camera won’t be able to automatically focus on it.
Chances are that the default focus points setting in your camera — the one you’re lumped with when your camera is set to fully automatic — will have all of the focus points activated at once. That might sound great but it can also be annoying, because if the camera is happy to focus on any random part of your scene within its spread of focus points, then you could end up with some pretty random focusing too.
What typically happens is this: one or more of the focus points will lock onto whichever object in the scene is big and contrasty and closest to the camera and then will focus your lens onto that. If that big contrasty foreground thing is a potplant in front of your Aunt Mavis then your aunt is likely to end up blurry and you’ll get a lovely sharp portrait of the pot plant.
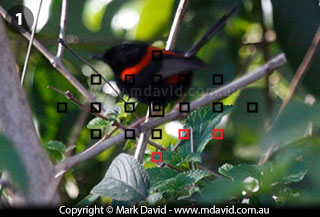
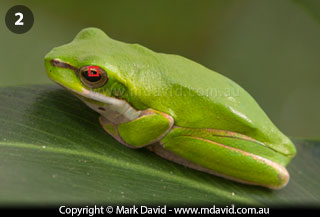
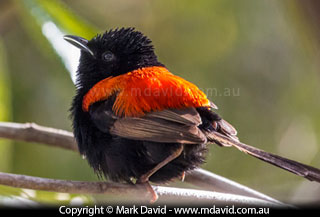
1: The kind of thing that can happen a lot when you leave it to your camera to decide which autofocus point to use. The camera focused on the foliage instead of the bird. 2: When I took this photo of the frog I activated only one focus point — the one over the frog’s eye indicated by the red square — to ensure that the eye came out looking sharp.
The photo of the blurry bird above is an example of the wrong focus points activating, resulting in the wrong part of the scene coming out sharp. It’s not that our cameras are faulty — it’s simply that they can’t be built smart enough to always guess correctly which parts of the scene we’d like to look sharp.
So the good news is, you probably don’t need to have all focus points working at once. Your camera manual will then let you know how to select any one point, or small cluster of points, to put you back in charge of which part of the scene you want looking sharp. Frame your shot so that your subject is directly behind your selected active focus points and your picture will end up the way it was supposed to be.
Most of the time I work with just my centre focus point activated, so the thing in the middle of the frame will always come out looking sharp, but of course I often select/activate other focus points too. Once you take charge of which ones you’re using then your focusing should be much easier to manage.
When your subject isn’t going anywhere, then one-shot autofocus will do the job. The bird is a Red-backed Fairy-wren.
Now that we’ve covered the subject of focus points, we need to tell our camera if our subject is standing still or moving. Which makes sense when you think about it. Because if it’s standing still then your camera can focus on it and then leave the focus where it is. But if your subject is moving then your camera needs to be constantly adjusting the focus to make up for the changing distance to the subject.
If you and your subject are standing still, then that’s the easiest kind of autofocusing. On those occasions, your distance between the camera and the subject isn’t constantly changing, and so once you focus on it you don’t have to change that either. You can select something called one-shot autofocus (or something similar to that term). What that means is a type of focusing where you look through the viewfinder, frame your subject directly behind the active focus point and press the shutter release button half way down. The autofocus will do its job and then you can take the shot.
Working in one-shot autofocus mode allows for a handy trick. I’m talking about locking the focus.
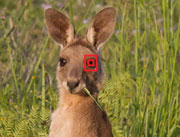
First thing you do is to aim your active focus point (I’m now assuming you’ve selected just one focus point) directly over whichever part of the scene you want looking the sharpest. In the example here it was the kangaroo’s eye. You focus by pressing the shutter button half way down. But not all the way down because pressing it all the way down takes a photo. So you’re only holding the button half way down, which is enough to activate the autofocus and lock it.
Then, while keeping that button held half way down you aim the camera somewhere else to create a more interesting composition. When you’ve framed a nicer composition the subject will still be in focus because you locked the focus by keeping that button held half way down.
Now squeeze the shutter button the rest of the way down to take the shot. Presto! You’ve discovered the benefits of locking focus!
In other words, having only the centre focus point activated no longer limits you to only having stuff in the middle of the scene in focus. Just be aware that this trick only works in one-shot autofocus mode, because it’s not much use locking your focus on one distance if your subject is moving.
When your subject’s moving towards you or away from you, then you’re going to need a kind of focus that keeps on adjusting/correcting itself.
That’s when you select a thing called servo focus. Servo focus not only keeps adjusting itself for as long as you have the shutter button held half way down (or held all the way down if you’re taking a burst of photos) but it also tries to predict where your subject is going so that it will already be focused on it after it’s moved. That’s why it’s sometimes called predictive autofocus. Or it can be called continuous autofocus.
Servo focus is great for situations like dogs running towards you or birds flying past. It would be crazy difficult focusing manually on a critter bolting towards you at 30kph, but automatic servo focus will often nail — and maintain — the focus on a moving subject for several seconds. Take a fast burst of photos while all this is going on and you could end up with a sequence of action shots like the dog photos shown below.
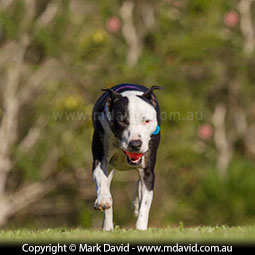
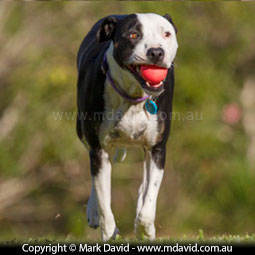
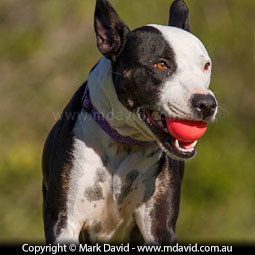
Servo focus will allow you to take sequences of shots of your subject moving towards you, constantly adjusting the focus so your subject always looks sharp.
One trick that will make things easier not only for the camera but also for you, is to have more than one focus point activated when in servo focus mode. That way, if your subject drifts out of the range of any one focus point then you’ll have some margin of error with those other, adjacent focus points ready to do the job.
Chances are there’ll be another option where your camera figures out if your subject is moving or not, and then determines whether it will use one-shot or servo auto-focus. My camera calls that setting AI Focus AF but your make of camera might give it another name. Whatever you call it, it can come in handy when you’re not sure what’s going to happen. But to be honest, I normally prefer to just make my own decision about whether to choose one-shot autofocus or servo autofocus.
Focusing a modern digital SLR sure can be easy these days thanks to some amazing technical wizardry, but it can also be complicated trying to figure out the best combinations of settings to use. So I encourage you to have a look through your camera’s manual, not only to find out what your options are, but also to learn how your particular model of camera lets you select them. When you do that, keep an eye out for some of the things I’ve mentioned above. There’s a good chance that you’ll need to experiment a bit to find out what combinations of settings work best for you and your camera and the way you like to work. That’s what I did, and now I don’t have to spend time thinking about which settings will get the effect I want.
Copyright © Mark David. All rights reserved


