
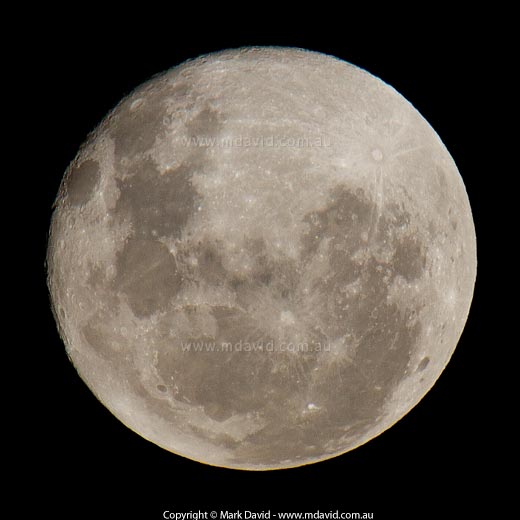
An almost-full moon photographed about half an hour after moonrise.
Taking a photo of the moon in the daytime is dead easy. It goes something like this:
1. Point camera at moon
2. Take photo
You can understand then, why I didn’t devote a whole article to daytime moon photography. But try that at night and it’s bound to end badly.
Because the camera’s going to try to get the exposure right for the sky instead of the moon. It’s going to think everything is way too dark and so it’s going to try to make everything lighter. Much lighter. So the moon will end up badly overexposed.
The sky’s still going to end up black, but the moon will end up as a pure white overexposed blob.
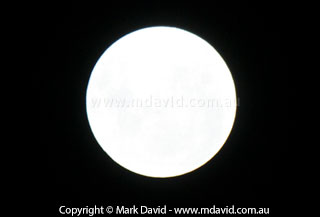
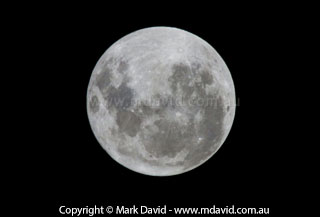
Left to its automatic settings, a camera is likely to get a totally blown-out disk of the moon like in this first image. Yes, that’s a real photo of the moon! In the next shot I used manual settings to force the exposure to go darker.
Normally you could use exposure compensation to tell your camera to make things darker. But when you’re taking photos of the moon, that might not be enough. Instead, it’s likely you’ll need to switch over to your camera’s manual mode.
The longer your lens, the better. A 200mm lens would be a minimum. 400mm or more is much better. However, even with a 400mm lens you’re going to have to crop your photo a lot if you want the moon to take up a reasonable proportion of the frame.
You’ll get the best results if you use a tripod.
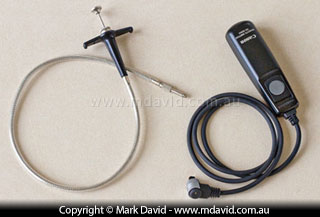
Some examples of cable releases. A mechanical one on the left and an electrical version. Different cameras require different types.
In this situation I also prefer to use a cable release. If you don’t have a cable release, then use a delayed exposure. Most cameras have that ability, to allow for firing the shot about 10 seconds after pressing the shutter button. That will give your camera enough time to stop vibrating after you press the shutter button.
Switch your camera to manual mode and then set your ISO to its lowest possible setting. That’s likely to be 100 or 200.
Set your aperture to f/10.
Set your shutter speed to 60th second.
It’s possible your auto focus will work but I tend to focus these kinds of shots manually. If you have the option to fine-tune your focus using a live-view feature on you camera (using the screen on the back of your camera to preview and zoom in on the scene) then go for it. Otherwise, careful focusing looking through the viewfinder will do the job.
Take a shot and see how it looks. Chances are its exposure is going to be a little wrong. If you need to make things darker then use a faster shutter speed. But if you need to make things brighter, be careful not to use a shutter speed much slower than about 30th second. The moon is moving through the sky at a speed that’s quite noticeable through a long lens and it will be easy to capture a little bit of motion blur with too slow a shutter speed. And the longer your lens, the more noticeable that motion will be. So remember you also have the option of making things brighter by using a bigger aperture (smaller f-number).
Once you get things right (you won’t need to experiment much if you start at those settings I advised) then take at least a few shots, just in case some camera-shake blur or bad focus creeps into your shot. And of course check your focus after every time you do something to your camera.
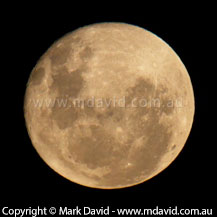
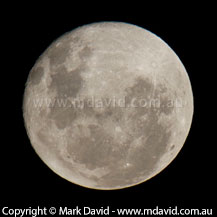
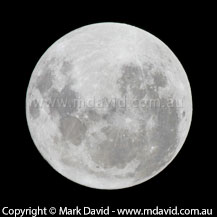
The moon changes colour during the night. Just after moonrise when a full moon is close to the horizon, particles in the Earth’s atmosphere tint the disk brown. The second photo was taken about 40 minutes after moonrise, when there was barely any colour left in the disk. The last shot was taken late at night when the moon high in the sky. At that angle we’re seeing the moon through the least amount of atmosphere, and so it shows the least amount of colour.
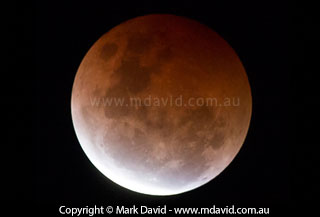
A ‘blood moon’ happens during a lunar eclipse, so it’s going to be heaps darker than a normal moon, requiring that you crank things up a bit to gather more light. My settings for this shot were: manual mode, f/5.6 at 0.6 seconds, ISO 800, tripod. Avoid having especially long exposures because as the moon moves through the sky you’ll just end up capturing some of that movement as motion blur.
If the moon is high in the sky it will come out in shades of grey. If it’s just above the horizon then the extra depth of atmosphere through which you’re seeing it will tint it in shades of brown.
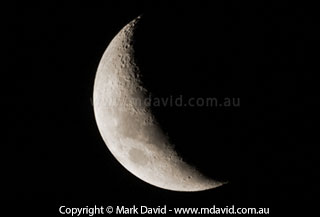
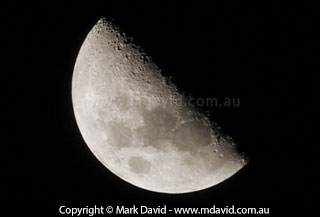
A crescent moon or half moon will often look more dramatic due to the side-lighting accentuating the mountains and craters. Those features will be especially noticeable along the edge of the shadow.
Surprisingly, a full moon will often produce the least dramatic shots because, when the moon is full the light is hitting it front on, and that tends the flatten its appearance by removing all the shadows. By contrast, a half moon or crescent moon, where it’s being lit from the side, will show some fantastic crater and mountain detail, especially around the edge of the light/dark regions.
Copyright © Mark David. All rights reserved | Mark David on Google+


