
You don’t need a super-modern professional digital SLR to take this shot. My camera is more than 8 years old and was only ever considered a “prosumer” model when it was new anyway. But it more than coped with the demands of this shot. Oh yeah, and I also used a tripod and cable release.
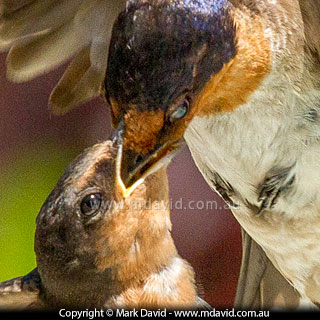
A slightly closer look at the image reveals that the focus was pretty much right where it should have been.
I didn’t use a flash but I did wait for the birds to settle into a patch of the kind of bright sunlight that would allow for speedy exposures.
I knew from past experience that I would benefit from a bit of depth of field because I wanted most of each bird to look sharp, and you control depth of field with your aperture. So I flipped the camera’s mode dial into Aperture priority and selected f/10. A bigger aperture (smaller f-number) like for example f/5.6 would have blurred the background in a more pleasing way but it would have also shrunk down the depth of field so much that it almost certainly would have blurred away too much of each bird.
At f/10 the camera wanted to shoot at too slow a shutter speed for my liking. I mean, this was a fast action shot after all. So I cranked up the ISO to 1,000. I know my camera (a Canon 7D — the original 7D, not the 7D Mark II) can work at that ISO level without creating a shocking snowstorm of pixel noise so I was happy to choose it. And in that bright light, even at the smallish aperture I’d picked, the camera chose a shutter speed of 1/1250th second, which I knew would be fast enough to eliminate most of the motion blur. If the shutter speed had been much slower than that then I would have cranked the ISO up even higher.
That’s right — when your aperture is locked in you can speed up or slow down your shutter speed by changing the ISO setting.
As much as I enjoy photographing wildlife I seriously don’t enjoy stressing birds and so I used my longest telephoto lens (400mm) to position myself a comfortable distance away (comfortable for the birds, that is.) And I kept an eye on the behaviour of the parent birds to see if I was spooking them. The parents just kept flying in to feed the young ones without any sign of change so I figured I hadn’t moved in too close.
Yep, I hate lugging tripods around tripods too but it would be just too difficult getting a shot like this without one. In fact I did originally try to get some shots without a tripod but for a whole bunch of reasons the results were pretty bad.
The main reason why I used a tripod was because I wanted to pre-focus the camera on exactly the right spot and then not have anything move even a millimetre from then on. Tripods do that really well. My hands, not so well.
With wildlife shots like this I set my camera and all its settings up in the distance and then carry the tripod and camera over to my chosen position working in super-slow motion. If people ask why I’m moving so slowly I usually joke that it’s because I’m paid by the hour but the truth is that I’m just avoiding making the kinds of quick movements that are likely to spook skittish wildlife.
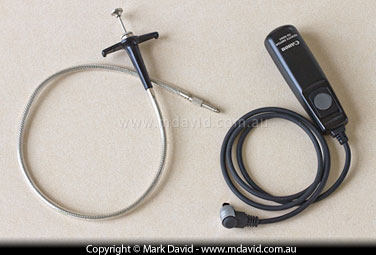
Mechanical (left) and electric (right) cable releases
I’ll always get less, or even zero camera shake when I’m using a cable release. If you’re wondering what a cable release is, well it’s a cord that plugs into your camera at one end and has a button on the other end. When you press the button it’s the same as pressing the shutter button on your camera, except the vibrations you make from pressing the button fail to travel all the way down the cable as far as the camera. So your camera sits perfectly still.
Cable releases used to be a simple wire running through a hollow cable. Push the button at one end and the wire pokes out the other end to fire the shutter. But recently camera makers have demanded you buy fancy electric ones that plug into a special port on the side of the camera. I guess they would argue that allows for smarter cable releases that can do things like timed exposures, but I also have a hunch that it’s so they can sell you more expensive toys, often requiring that you buy a new cable release for each new camera body as they keep changing the specifications.
I turned it off because the image stabilisation (also known as vibration reduction) on my lens does strange things if you leave it on during tripod work. The manual that came with your lens will tell what your approach should be here.
There’s nothing worse than squeezing the shutter button and having nothing happening because your camera is hunting for focus before it can fire off a shot. And I knew that would be precisely what would happen if I tried taking a shot with autofocus, because I knew all the action happened so damned fast. So I turned off autofocus and focused manually using the live view screen on my camera. That enabled me to focus on where I guessed the eyes of both birds would be during that brief split second frenzy of feeding, and the largish depth of field achieved with my smallish aperture meant that I didn’t have to be super accurate with my guesswork. The tripod would ensure that, once I got the focus set, nothing would move.
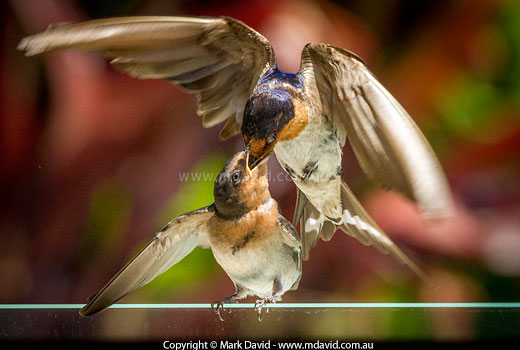
Welcome Swallows are amazing at aerobatics. They fly impossibly fast and they zoom in and feed the young with equally mind-numbing speed and precision. There’s just no way my shutter button finger timing could be good enough to nail the magic moment of the birds connecting. So I used fast-burst mode, which made my camera fire off at 8 frames a second, and then afterwards I simply picked the shot I liked most out of the resulting sequence. That way you also get nice bonus sequences of before and after shots of the birds zooming in and out.
I didn’t want to frame the shots too tightly because I wanted enough clear space about the young bird to also capture the flying parent bird. And if I’d framed the shot a bit too distantly then I knew I always had the option of cropping the shot a little, once I got it into my computer. What I’m trying to say here is, with a 400mm lens the temptation is to always frame the subject as closely as possible purely because you can but in this kind of shot it means you might be cutting off some of the action too. So I actually zoomed back out to 275mm.
Getting sharp pictures of flying birds is a lot easier when you knew exactly where they’re going to be. I was able to keep getting sharp images of the birds for as long as the parent birds kept turning up to feed the young ones.
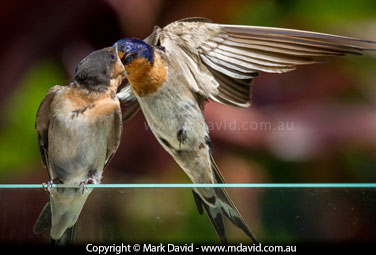
This is the bit where the young birds actually helped me do my job. You see, I didn’t even know when to start firing the camera because everything happened so fast, but I found out soon enough that I didn’t need to know. That’s because the young birds would tell me, quite vocally, exactly when to press the shutter button, even with a bit of handy advance warning! What happened was, when they’d see an adult bird flying in towards them — and the little guys invariably spotted it before I did — they’d get super excited and would start chirping loudly, leaning forward and shaking with their beaks wide open hoping for a feed. Those were my completely unambiguous audible and visual signals that a parent bird was about to fly in and so it was my cue to squeeze and hold down the cable release button to commence firing off a burst of exposures. Over the next two seconds or so, the adult would fly in, feed the youngster and fly out when it was over and the birds would calm down, which of course was my cue to let go of the shutter button.
Now, I made the claim earlier that these photos were the easiest kinds of photography to do, and so I’d better back that claim up. If the birds were chirping that told me to squeeze the cable release button down because that was when all the fun stuff was happening right where I’d focused the lens. If the birds were chilled out that told me to let go of the button. That was the grand total of what I had to do and the grand total of how “difficult” it was. All the hassle was in setting the gear up like I described above. Photography doesn’t get any easier than that.
I knew that in the harsh sunlight the lighter coloured plumage on the birds would likely be “blown out” (over-exposed so badly that the camera would fail to capture any detail at all) so I deliberately set my camera to underexpose by about one stop using Exposure Compensation. Then later on in Lightroom, I just dragged a slider to pull the exposure back up a little bit (stopping just before the light bits lost their detail) and then I lightened the shadows with the shadows slider enough to draw some detail back out of the dark bits.
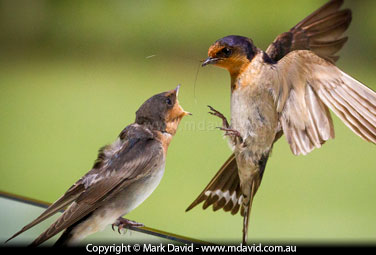
Once I had figured out where to pre-focus, all the shots turned out tack-sharp. Here’s one more out of a whole bunch of bird-feeding shots I took during that session.
The system I described above was almost fool-proof, but of course I still managed to find a way of getting things wrong. You see, every time the adult bird flew in I was able to nail the timing thanks to the fast burst sequences getting the shot I wanted. But in the first series of shots I took the birds were a little bit out of focus. That’s because I hadn’t taken into account the fact that the young bird would lean forward out of the position I’d focused on to get fed. So after taking a few shots in the beginning I checked the results on the screen on the back of my camera, noticed the problem, and then started experimenting with the focus. Once I got it right, every series of exposures worked out just fine.
You don’t need clairvoyance or sneaky tools like infra-red triggers or even the absolute latest model of pro equipment to take these kinds of shots. If your camera can sit on a tripod and shoot in fast bursts then it’ll do. And you don’t need outrageously accurate autofocus if you know where the action is going to happen and so you can manually focus in advance. That leaves the rest of the tasks to be well within the capabilities of most reasonably recent digital SLRS and most photographers. So I’ll say it again: my camera is 8 years old and it nailed every shot predictably and easily. You just have to know what to tell your camera to do.
Copyright © Mark David. All rights reserved | Mark David on Google+


